Monday, August 6, 2018

Maven: Difference between plugins and dependencies


In Maven POM file we can define both plugins and dependencies which could be little confusing
sometime to understand the difference.


Both plugins and dependencies are Jar files.
But the difference between them is, most of the work in maven is done using plugins; whereas dependency is just a Jar file which will be added to the classpath while executing the tasks.
For example, you use a compiler-plugin to compile the java files. You can't use compiler-plugin as a dependency since that will only add the plugin to the classpath, and will not trigger any compilation. The Jar files to be added to the classpath while compiling the file, will be specified as a dependency.
Same goes with your scenario. You have to use spring-plugin to execute some spring executables [ I'm not sure what spring-plugins are used for. I'm just taking a guess here ]. But you need dependencies to execute those executables. And Junit is tagged under dependency since it is used by surefire-plugin for executing unit-tests.
So, we can say, plugin is a Jar file which executes the task, and dependency is a Jar which provides the class files to execute the task.

Tuesday, July 17, 2018

Important Jira/Confluence plug-in

1. Tempo Timesheets


Painless time tracking, powerful reporting, better overview of time spent on projects and throughout your organization


2. Balsamiq Wire-frames 


Life's too short for bad software! Add wireframes and simple prototypes to your Confluence pages and design delightful interfaces


3. Gliffy Diagram for Confluence

Diagrams Made Easy – Gliffy Diagrams for Confluence Improves Your Team’s Ability to Communicate and Collaborate Visually


Tuesday, July 10, 2018

What is the Different between JSON and YAML?

JSON  =  Java script object notation. 

What It Is:
JSON (JavaScript Object Notation) is a lightweight data-interchange format. It is easy for humans to read and write. It is easy for machines to parse and generate. It is based on a subset of the JavaScript Programming Language,Standard ECMA-262 3rd Edition - December 1999. JSON is a text format that is completely language independent but uses conventions that are familiar to programmers of the C-family of languages, including C, C++, C#, Java, JavaScript, Perl, Python, and many others. These properties make JSON an ideal data-interchange language.

More details here: 

https://www.json.org/

YAML = YAML Ain't Markup Language
What It Is:
 YAML is a human friendly data serialization  standard for all programming languages.

More Details here:
http://yaml.org/


Sample JSON:

  • { "QueryResponse": { "maxResults": 1, "startPosition": "1", "Employee": { "Organization": false, "Title": "Mrs.", "GivenName": "Jane", "MiddleName": "Lane", "FamilyName": "Doe", "DisplayName": "Jane Lane Doe", "PrintOnCheckName": "Jane Lane Doe", "Active": true, "PrimaryPhone": { "FreeFormNumber": "505.555.9999" }, "PrimaryEmailAddr": { "Address": "janedoe@example.com" }, "EmployeeType": "Regular", "status": "Synchronized", "Id": "ABC123", "SyncToken": 1, "MetaData": { "CreateTime": "2015-04-26T19:45:03Z", "LastUpdatedTime": "2015-04-27T21:48:23Z" }, "PrimaryAddr": { "Line1": "123 Any Street", "City": "Any City", "CountrySubDivisionCode": "WA", "PostalCode": "01234" } } }, "time": "2015-04-27T22:12:32.012Z" }
Sample YAML
  • --- QueryResponse: maxResults: 1 startPosition: '1' Employee: Organization: false Title: Mrs. GivenName: Jane MiddleName: Lane FamilyName: Doe DisplayName: Jane Lane Doe PrintOnCheckName: Jane Lane Doe Active: true PrimaryPhone: FreeFormNumber: 505.555.9999 PrimaryEmailAddr: Address: janedoe@example.com EmployeeType: Regular status: Synchronized Id: ABC123 SyncToken: 1 MetaData: CreateTime: '2015-04-26T19:45:03Z' LastUpdatedTime: '2015-04-27T21:48:23Z' PrimaryAddr: Line1: 123 Any Street City: Any City CountrySubDivisionCode: WA PostalCode: '01234' time: '2015-04-27T22:12:32.012Z'

Relation to JSON

Both JSON and YAML aim to be human readable data interchange formats. However, JSON and YAML have different priorities. JSON’s foremost design goal is simplicity and universality. Thus, JSON is trivial to generate and parse, at the cost of reduced human readability. It also uses a lowest common denominator information model, ensuring any JSON data can be easily processed by every modern programming environment.

In contrast, YAML’s foremost design goals are human readability and support for serializing arbitrary native data structures. Thus, YAML allows for extremely readable files, but is more complex to generate and parse. In addition, YAML ventures beyond the lowest common denominator data types, requiring more complex processing when crossing between different programming environments.

YAML can therefore be viewed as a natural superset of JSON, offering improved human readability and a more complete information model. This is also the case in practice; every JSON file is also a valid YAML file. This makes it easy to migrate from JSON to YAML if/when the additional features are required.

JSON's RFC4627 requires that mappings keys merely “SHOULD” be unique, while YAML insists they “MUST” be. Technically, YAML therefore complies with the JSON spec, choosing to treat duplicates as an error. In practice, since JSON is silent on the semantics of such duplicates, the only portable JSON files are those with unique keys, which are therefore valid YAML files.

It may be useful to define a intermediate format between YAML and JSON. Such a format would be trivial to parse (but not very human readable), like JSON. At the same time, it would allow for serializing arbitrary native data structures, like YAML. Such a format might also serve as YAML’s "canonical format". Defining such a “YSON” format (YSON is a Serialized Object Notation) can be done either by enhancing the JSON specification or by restricting the YAML specification. Such a definition is beyond the scope of this specification


Wednesday, June 27, 2018

Installing Jenkins in CentOS 7

There are two basic ways to install Jenkins on CentOS: through a repository, or repo, and via the WAR file. Installing from a repo is the preferred method, and it's what we'll outline first.


$ java -version
openjdk version "1.8.0_171"
OpenJDK Runtime Environment (build 1.8.0_171-b10)
OpenJDK 64-Bit Server VM (build 25.171-b10, mixed mode)

Jenkins Version:
jenkins-2.129


Installing from the Repo

Now, run the following to download Jenkins from the Red Hat repo:

$ sudo wget -O /etc/yum.repos.d/jenkins.repo http://pkg.jenkins-ci.org/redhat/jenkins.repo

The wget tool downloads files into the filename specified after the "O" flag (that's a capital 'O', not a zero).


Then, import the verification key using the package manager RPM:
  • sudo rpm --import https://jenkins-ci.org/redhat/jenkins-ci.org.key


Finally, install Jenkins by running:
  • sudo yum install jenkins
That's it! You should now be able to start Jenkins as a service:
  • sudo systemctl start jenkins.service


Once the service has started, you can check its status:
  • sudo systemctl status jenkins.service


his will give you a fairly lengthy readout with a lot of information on how the process started up and what it's doing, but if everything went well, you should see two lines similar to the following:
Loaded: loaded (/etc/systemd/system/jenkins.service; disabled)
Active: active (running) since Tue 2015-12-29 00:00:16 EST; 17s ago
This means that the Jenkins services completed its startup and is running. You can confirm this by visiting the web interface as before, at http://ip-of-your-machine:8080.

You might see a screen like below :

Run the bellow command and get the password:

$ sudo cat /var/lib/jenkins/secrets/initialAdminPassword


Select Install suggested plugins.

It will install the recommended plug-ins


Now Create the Admin user and click Save and continue


You can give a Custom Url:


Done!


Now you can see the Home Screen

Welcome to Jenkins! The Jenkins dashboard.


Likewise, you can stop the service:
  • sudo systemctl stop jenkins.service
or restart it:
  • sudo systemctl restart jenkins.service

https://www.digitalocean.com/community/tutorials/how-to-set-up-jenkins-for-continuous-development-integration-on-centos-7


Thursday, June 21, 2018

Understanding NGINX proxy_pass directive

General Proxying Information

If you have only used web servers in the past for simple, single server configurations, you may be wondering why you would need to proxy requests.
One reason to proxy to other servers from Nginx is the ability to scale out your infrastructure. Nginx is built to handle many concurrent connections at the same time. This makes it ideal for being the point-of-contact for clients. The server can pass requests to any number of backend servers to handle the bulk of the work, which spreads the load across your infrastructure. This design also provides you with flexibility in easily adding backend servers or taking them down as needed for maintenance.
Another instance where an http proxy might be useful is when using an application servers that might not be built to handle requests directly from clients in production environments. Many frameworks include web servers, but most of them are not as robust as servers designed for high performance like Nginx. Putting Nginx in front of these servers can lead to a better experience for users and increased security.
Proxying in Nginx is accomplished by manipulating a request aimed at the Nginx server and passing it to other servers for the actual processing. The result of the request is passed back to Nginx, which then relays the information to the client. The other servers in this instance can be remote machines, local servers, or even other virtual servers defined within Nginx. The servers that Nginx proxies requests to are known as upstream servers.
Nginx can proxy requests to servers that communicate using the http(s), FastCGI, SCGI, and uwsgi, or memcached protocols through separate sets of directives for each type of proxy. In this guide, we will be focusing on the http protocol. The Nginx instance is responsible for passing on the request and massaging any message components into a format that the upstream server can understand.

Deconstructing a Basic HTTP Proxy Pass

The most straight-forward type of proxy involves handing off a request to a single server that can communicate using http. This type of proxy is known as a generic "proxy pass" and is handled by the aptly named proxy_pass directive.
The proxy_pass directive is mainly found in location contexts. It is also valid in if blocks within a location context and in limit_except contexts. When a request matches a location with a proxy_pass directive inside, the request is forwarded to the URL given by the directive.
Let's take a look at an example:
# server context

location /match/here {
    proxy_pass http://example.com;
}

. . .

In the above configuration snippet, no URI is given at the end of the server in the proxy_pass definition. For definitions that fit this pattern, the URI requested by the client will be passed to the upstream server as-is.
For example, when a request for /match/here/please is handled by this block, the request URI will be sent to the example.com server as http://example.com/match/here/please.
Let's take a look at the alternative scenario:
# server context

location /match/here {
    proxy_pass http://example.com/new/prefix;
}

. . .
In the above example, the proxy server is defined with a URI segment on the end (/new/prefix). When a URI is given in the proxy_pass definition, the portion of the request that matches the location definition is replaced by this URI during the pass.
For example, a request for /match/here/please on the Nginx server will be passed to the upstream server as http://example.com/new/prefix/please. The /match/here is replaced by /new/prefix. This is an important point to keep in mind.
Sometimes, this kind of replacement is impossible. In these cases, the URI at the end of the proxy_passdefinition is ignored and either the original URI from the client or the URI as modified by other directives will be passed to the upstream server.
For instance, when the location is matched using regular expressions, Nginx cannot determine which part of the URI matched the expression, so it sends the original client request URI. Another example is when a rewrite directive is used within the same location, causing the client URI to be rewritten, but still handled in the same block. In this case, the rewritten URI will be passed.

More Details here

understanding-nginx-http-proxying-load-balancing-buffering-and-caching

Friday, June 8, 2018

GETTING STARTED WITH SWAGGER

What is Swagger? 

If you’ve ever worked with APIs, chances are, you’ve heard of Swagger. Swagger is the most widely used tooling ecosystem for developing APIs with the OpenAPI Specification (OAS). Swagger consists of both open source as well as professional tools, catering to almost every need and use case. 

Example Swagger file :

let talk about details about the Swagger file format :


Thursday, June 7, 2018

4+1 architectural view model


4+1 is a view model designed by Philippe Kruchten for "describing the architecture of software-intensive systems, based on the use of multiple, concurrent views".[1] The views are used to describe the system from the viewpoint of different stakeholders, such as end-users, developers and project managers. The four views of the model are logical, development, process and physical view. In addition selected use cases or scenarios are used to illustrate the architecture serving as the 'plus one' view. Hence the model contains 4+1 views:


  •  Development View 

 The development view illustrates a system from a programmer's perspective and is concerned with software management. This view is also known as the implementation view. It uses the UML Component diagram to describe system components. UML Diagrams used to represent the development view include the Package diagram.


Component Diagram example :

  • Logical view


  • The logical view is concerned with the functionality that the system provides to end-users. UML diagrams used to represent the logical view include, class diagrams, and state diagrams.[2]


  • Physical view: The physical view depicts the system from a system engineer's point of view. It is concerned with the topology of software components on the physical layer as well as the physical connections between these components. This view is also known as the deployment view. UML diagrams used to represent the physical view include the deployment diagram.[2]


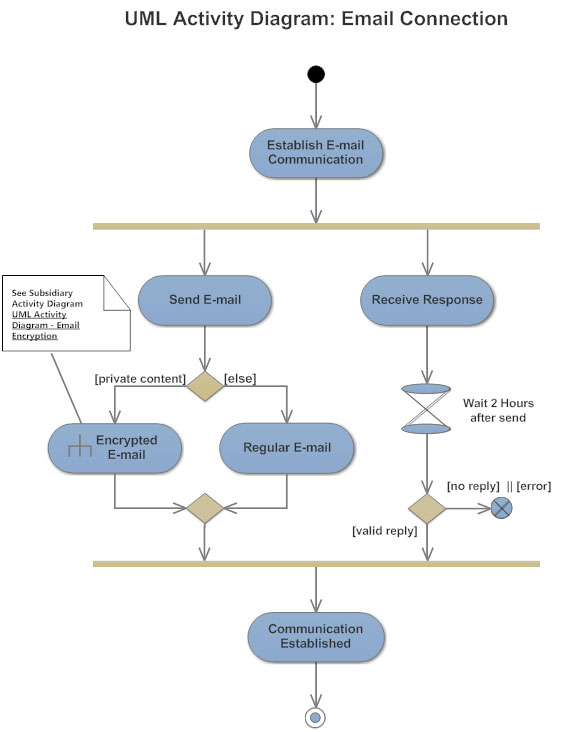
  • Process view: The process view deals with the dynamic aspects of the system, explains the system processes and how they communicate, and focuses on the runtime behavior of the system. The process view addresses concurrency, distribution, integrators, performance, and scalability, etc. UML diagrams to represent process view include the activity diagram.[2]
Activity diagram example

  • Scenarios: The description of an architecture is illustrated using a small set of use cases, or scenarios, which become a fifth view. The scenarios describe sequences of interactions between objects and between processes. They are used to identify architectural elements and to illustrate and validate the architecture design. They also serve as a starting point for tests of an architecture prototype. This view is also known as the use case view.

SearchPastEventResults_UC_1.1.2.1.1.jpg

5 Strategies for Getting More Work Done in Less Time

Summary.    You’ve got more to do than could possibly get done with your current work style. You’ve prioritized. You’ve planned. You’ve dele...