Wednesday, June 27, 2018

Installing Jenkins in CentOS 7

There are two basic ways to install Jenkins on CentOS: through a repository, or repo, and via the WAR file. Installing from a repo is the preferred method, and it's what we'll outline first.


$ java -version
openjdk version "1.8.0_171"
OpenJDK Runtime Environment (build 1.8.0_171-b10)
OpenJDK 64-Bit Server VM (build 25.171-b10, mixed mode)

Jenkins Version:
jenkins-2.129


Installing from the Repo

Now, run the following to download Jenkins from the Red Hat repo:

$ sudo wget -O /etc/yum.repos.d/jenkins.repo http://pkg.jenkins-ci.org/redhat/jenkins.repo

The wget tool downloads files into the filename specified after the "O" flag (that's a capital 'O', not a zero).


Then, import the verification key using the package manager RPM:
  • sudo rpm --import https://jenkins-ci.org/redhat/jenkins-ci.org.key


Finally, install Jenkins by running:
  • sudo yum install jenkins
That's it! You should now be able to start Jenkins as a service:
  • sudo systemctl start jenkins.service


Once the service has started, you can check its status:
  • sudo systemctl status jenkins.service


his will give you a fairly lengthy readout with a lot of information on how the process started up and what it's doing, but if everything went well, you should see two lines similar to the following:
Loaded: loaded (/etc/systemd/system/jenkins.service; disabled)
Active: active (running) since Tue 2015-12-29 00:00:16 EST; 17s ago
This means that the Jenkins services completed its startup and is running. You can confirm this by visiting the web interface as before, at http://ip-of-your-machine:8080.

You might see a screen like below :

Run the bellow command and get the password:

$ sudo cat /var/lib/jenkins/secrets/initialAdminPassword


Select Install suggested plugins.

It will install the recommended plug-ins


Now Create the Admin user and click Save and continue


You can give a Custom Url:


Done!


Now you can see the Home Screen

Welcome to Jenkins! The Jenkins dashboard.


Likewise, you can stop the service:
  • sudo systemctl stop jenkins.service
or restart it:
  • sudo systemctl restart jenkins.service

https://www.digitalocean.com/community/tutorials/how-to-set-up-jenkins-for-continuous-development-integration-on-centos-7




Thursday, June 21, 2018

Understanding NGINX proxy_pass directive

General Proxying Information

If you have only used web servers in the past for simple, single server configurations, you may be wondering why you would need to proxy requests.
One reason to proxy to other servers from Nginx is the ability to scale out your infrastructure. Nginx is built to handle many concurrent connections at the same time. This makes it ideal for being the point-of-contact for clients. The server can pass requests to any number of backend servers to handle the bulk of the work, which spreads the load across your infrastructure. This design also provides you with flexibility in easily adding backend servers or taking them down as needed for maintenance.
Another instance where an http proxy might be useful is when using an application servers that might not be built to handle requests directly from clients in production environments. Many frameworks include web servers, but most of them are not as robust as servers designed for high performance like Nginx. Putting Nginx in front of these servers can lead to a better experience for users and increased security.
Proxying in Nginx is accomplished by manipulating a request aimed at the Nginx server and passing it to other servers for the actual processing. The result of the request is passed back to Nginx, which then relays the information to the client. The other servers in this instance can be remote machines, local servers, or even other virtual servers defined within Nginx. The servers that Nginx proxies requests to are known as upstream servers.
Nginx can proxy requests to servers that communicate using the http(s), FastCGI, SCGI, and uwsgi, or memcached protocols through separate sets of directives for each type of proxy. In this guide, we will be focusing on the http protocol. The Nginx instance is responsible for passing on the request and massaging any message components into a format that the upstream server can understand.

Deconstructing a Basic HTTP Proxy Pass

The most straight-forward type of proxy involves handing off a request to a single server that can communicate using http. This type of proxy is known as a generic "proxy pass" and is handled by the aptly named proxy_pass directive.
The proxy_pass directive is mainly found in location contexts. It is also valid in if blocks within a location context and in limit_except contexts. When a request matches a location with a proxy_pass directive inside, the request is forwarded to the URL given by the directive.
Let's take a look at an example:
# server context

location /match/here {
    proxy_pass http://example.com;
}

. . .

In the above configuration snippet, no URI is given at the end of the server in the proxy_pass definition. For definitions that fit this pattern, the URI requested by the client will be passed to the upstream server as-is.
For example, when a request for /match/here/please is handled by this block, the request URI will be sent to the example.com server as http://example.com/match/here/please.
Let's take a look at the alternative scenario:
# server context

location /match/here {
    proxy_pass http://example.com/new/prefix;
}

. . .
In the above example, the proxy server is defined with a URI segment on the end (/new/prefix). When a URI is given in the proxy_pass definition, the portion of the request that matches the location definition is replaced by this URI during the pass.
For example, a request for /match/here/please on the Nginx server will be passed to the upstream server as http://example.com/new/prefix/please. The /match/here is replaced by /new/prefix. This is an important point to keep in mind.
Sometimes, this kind of replacement is impossible. In these cases, the URI at the end of the proxy_passdefinition is ignored and either the original URI from the client or the URI as modified by other directives will be passed to the upstream server.
For instance, when the location is matched using regular expressions, Nginx cannot determine which part of the URI matched the expression, so it sends the original client request URI. Another example is when a rewrite directive is used within the same location, causing the client URI to be rewritten, but still handled in the same block. In this case, the rewritten URI will be passed.

More Details here

understanding-nginx-http-proxying-load-balancing-buffering-and-caching

Friday, June 8, 2018

GETTING STARTED WITH SWAGGER

What is Swagger? 

If you’ve ever worked with APIs, chances are, you’ve heard of Swagger. Swagger is the most widely used tooling ecosystem for developing APIs with the OpenAPI Specification (OAS). Swagger consists of both open source as well as professional tools, catering to almost every need and use case. 

Example Swagger file :

let talk about details about the Swagger file format :


Thursday, June 7, 2018

4+1 architectural view model


4+1 is a view model designed by Philippe Kruchten for "describing the architecture of software-intensive systems, based on the use of multiple, concurrent views".[1] The views are used to describe the system from the viewpoint of different stakeholders, such as end-users, developers and project managers. The four views of the model are logical, development, process and physical view. In addition selected use cases or scenarios are used to illustrate the architecture serving as the 'plus one' view. Hence the model contains 4+1 views:


  •  Development View 

 The development view illustrates a system from a programmer's perspective and is concerned with software management. This view is also known as the implementation view. It uses the UML Component diagram to describe system components. UML Diagrams used to represent the development view include the Package diagram.


Component Diagram example :

  • Logical view


  • The logical view is concerned with the functionality that the system provides to end-users. UML diagrams used to represent the logical view include, class diagrams, and state diagrams.[2]


  • Physical view: The physical view depicts the system from a system engineer's point of view. It is concerned with the topology of software components on the physical layer as well as the physical connections between these components. This view is also known as the deployment view. UML diagrams used to represent the physical view include the deployment diagram.[2]


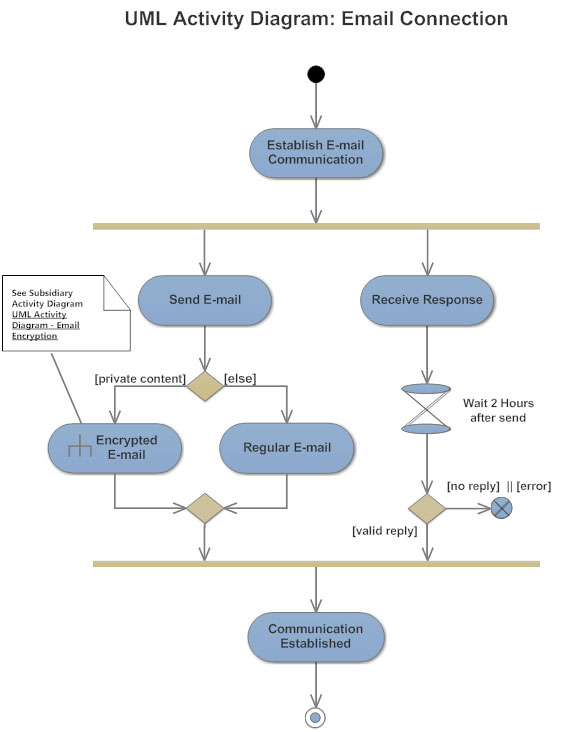
  • Process view: The process view deals with the dynamic aspects of the system, explains the system processes and how they communicate, and focuses on the runtime behavior of the system. The process view addresses concurrency, distribution, integrators, performance, and scalability, etc. UML diagrams to represent process view include the activity diagram.[2]
Activity diagram example

  • Scenarios: The description of an architecture is illustrated using a small set of use cases, or scenarios, which become a fifth view. The scenarios describe sequences of interactions between objects and between processes. They are used to identify architectural elements and to illustrate and validate the architecture design. They also serve as a starting point for tests of an architecture prototype. This view is also known as the use case view.

SearchPastEventResults_UC_1.1.2.1.1.jpg

Monday, June 4, 2018

How to access windows share directory from Linux

Example given for Window 10 and CentOS 7:

1. Check your windows IP address: You can do it from command prompt using ipconfig command 


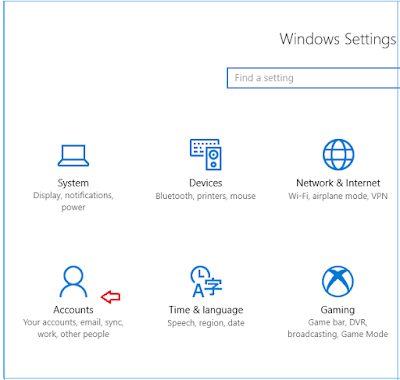
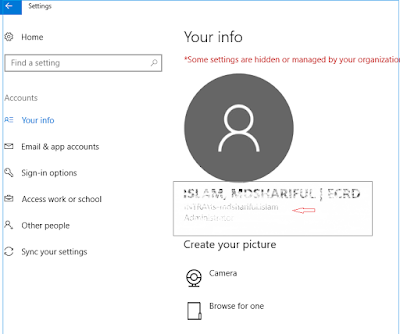
2. Check your windows logged in user name : You can check it from setting > account


3. Make sure you can ping the IP-address from you Linux machine 


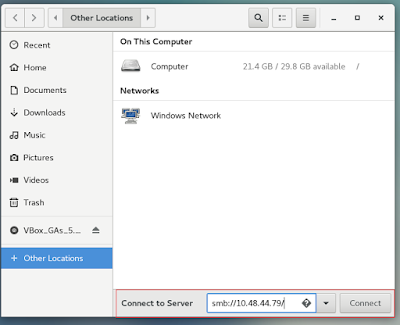
4. Go to Browse Network from Places Menu


5. Click on Other Locations


6. enter the ip addrss using smb like below:


7. Enter you windows user name and password:


Done! Now you can browse/copy file from windows to Linux


Enjoy !

Important Java Libraries

1. Jackson :

Jackson is a very popular and efficient java based library to serialize or map java objects to JSON and vice versa


Example:


2. Saxon XSLT

Saxon is an XSLT and XQuery processor created by Michael Kay and now developed and maintained by his company, Saxonica. There are open-source and also closed-source commercial versions. Versions exist for JavaJavaScript[1] and .NET.


Details list is available here:


Sunday, June 3, 2018

What is new in Java

JavaSE 11 Features

  • Coming soon....
JavaSE 10 Features

  • Local Variable Type Inference
  • Time-Based Release Versioning
  • Garbage-Collector Interface
  • Parallel Full GC for G1
  • Heap Allocation on Alternative Memory Device
  • Consolidate the JDk Forest Into a Single Repository
  • Root Certificates
  • Experimental Java-Based JIT Compiler
  • Thread-Local Handshakes
  • Remove the Native-Header Generation Tool

JavaSE 9 Features

  • The Java platform Module system 
  • Linking
  • JShell: the interactive Java REPL
  • Improved Javadoc
  • Collection Factory Methods
  • Stream API Improvements
  • Private Interface Method
  • HTTP/2
  • Multi Release JARs


JavaSE 8 Features

The important features of JavaSE 8 are lambda expressions, methods references, default methods, functional interface, java 8 date/time, stream classes etc.

JavaSE 7 Features

The important features of JavaSE 7 are try with resource, catching multiple exceptions etc.
  • String in switch statement (Java 7)
  • Binary Literals (Java 7)
  • The try-with-resources (Java 7)
  • Caching Multiple Exceptions by single catch (Java 7)
  • Underscores in Numeric Literals (Java 7)


JavaSE 6 Features

The important feature of JavaSE 6 is premain method (also known as instrumentation).
  • Instrumentation (premain method) (Java 6)

J2SE 5 Features

The important features of J2SE 5 are generics and assertions. Others are auto-boxing, enum, var-args, static import, for-each loop (enhanced for loop etc.
J2SE 4 Features

The important feature of J2SE 4 is assertions. It is used for testing.

5 Strategies for Getting More Work Done in Less Time

Summary.    You’ve got more to do than could possibly get done with your current work style. You’ve prioritized. You’ve planned. You’ve dele...